by Jason Prahl | Jul 14, 2006 | Blog, Computer Tips, Microsoft Windows
 If you use Microsoft Exchange for your email you should take some time to run the Exchange Best Practices Tool. I ran it on our Exchange server and luckily didn’t find any major flaws in our configuration, but the tool did point out several things that we could be doing differently.
One thing that we didn’t have configured was the Exchange Intelligent Message Filter which we were not utilizing. I recently found out about this filter because of a Microsoft Exchange class I am taking. Any added tools to combat and reduce the amount of spam entering our organization is certainly welcome. This best practice tool told me I didn’t have it enabled and how to turn it on. Just since turning it on I’ve already seen a handful of emails it has blocked that were truly spam and hadn’t been stopped by our third party spam filter Open Relay Filter by Vamsoft (which does do a great job of stopping most spam.)
The tool also pointed out several services that were running on my exchange box that were un-necessary. I was a bit nervous when I went to run it thinking I’d find a bunch of big bad things we had with our Exchange. The tool is available for download for free and is a great tool in securing and maintaining the health of Exchange email systems.
by Jason Prahl | Jun 27, 2006 | Blog, Computer Tips, Microsoft Windows
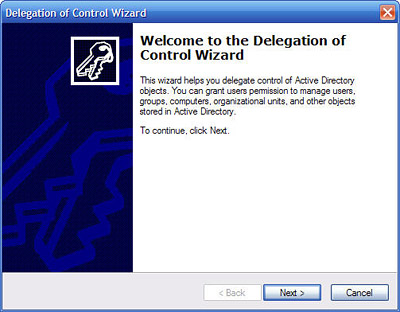 I have a user I want to be able to disable or enable other domain user accounts without giving that user to much permissions. I spent some time Googling and on Microsoft’s support site and couldn’t find a specific permission that allowed just that. I found one that allows you to delegate the ability to unlock a user account. After playing with this for a couple of hours I grew to appreciate the complexity and power Active Directory gives an administrator over a domain. What I finally ended up using was a permission that allows for the user to enable/disable as well as change anything in the account options window on the Account tab. A bit more than I wanted to give, but not a problem in my case.
Right-click your domain and select delegate control. The delegate control wizard starts, click next to begin. Next select the users or groups that you want to delegate the responsibility to. In my case I have a group called “DisableEnableUsers” that I want to give the ability to disable/enable user accounts.
Next select create custom task to delegate radio button and hit next. On the “Delegate control of:” dialog select “Only the following objects” and scroll down to “User Objects” hit next. Put a check in the “General” box on the “Show these permissions:” window. Scroll down to the “Read and Write Account Restrictions.” Hit next and finish.
Now the users and or groups you delegated control to “Read and Write Account Restrictions” will be able to disable or enable user accounts.
by Jason Prahl | Jun 24, 2006 | Blog, Computer Tips, Microsoft Windows
 I’ve used Nero almost exclusively for burning for several years now. I recently purchased the latest version and installed the whole thing. It now comes with a bunch of applications 90% of which I care nothing about. One new annoyance, in my opinion, is something called Nero Scout.
Truthfully I don’t even know what it is. It looked like something for finding and cataloging media files. I have my ways and methods and don’t need a new tool for this. It puts an annoying icon in my Windows Explorer that I don’t want there. I’m very particular about my computers and I don’t want anything extra floating around anywhere. So I figured it must have been installed with all the extra junk and it must go away if I remove all of the Nero applications except the actual burning part. Wrong. It was still there after un-installing all the rest. So after some poking around the web I found the following commands to remove the little pest. Goto Start/Run and execute one of these. It simply un-registers the dll associated with Nero Scout.
Remove Nero Scout:
regsvr32 /u “%commonprogramfiles%\Ahead\Lib\MediaLibraryNSE.dll”
Put it back:
regsvr32 “%commonprogramfiles%\Ahead\Lib\MediaLibraryNSE.dll”
Thanks to DjLizard.net for the info
by Jason Prahl | Jun 16, 2006 | Blog, Computer Tips, Microsoft Windows
 DRM keeps poking up it’s ugly head, and it’s really beginning to irk me. I mainly use Windows Media Center to record HBO movies. I had about 9 or so recorded, and today I’m sick, so I thought it would be a perfect time to watch some of them, but what do you know, none of them work. I tried my main PC running Media Center, and the Media Center Extender in the front room. Both give an an error saying it’s protected content and won’t let me watch any of them!
I read about people running into issues after installing Update Rollup 2 for Media Center 2005, because Rollup 2 installs an updated Digital Rights Management (DRM) package. I’ve had the Rollup 2 installed for months with no problems, and now all of a sudden I’m getting this protected content crap!
I found this statement on Microsoft’s website. The Microsoft Windows Media Digital Rights Management (DRM) system may not work if you make changes to your computer hardware.
So basically if certain components are changed in your PC, like I changed out a hard drive, Windows Media DRM may not work because it views the change as an unauthorized attempt to move protected content to another computer. Crap like this makes me want to pirate everything, and not purchase anything legally anymore. I’m paying for HBO, and I can’t even record it! Ahhh.
So for the others who may run into this problem, here’s the fix, courtesy of Aaron Stebner. Be sure to back up any licenses to protected content first, and then perform the following steps:
- Close Media Center and Windows Media Player.
- Click Start, Run. In the Open box, type cmd and click OK to open a Command Prompt window. At the command prompt, enter the command net stop ehrecvr and press Enter.
- Click Start, Run. In the Open box, type %allusersprofile%\drm and Press Enter.
- In the Windows Explorer window for the DRM folder, choose Tools, Folder Options. Click the View tab and select the Show hidden files and folders option and then clear the Hide protected operating system files option. Click OK to close the Folder Options dialog box.
- Click in the Windows Explorer window for the DRM folder, press Ctrl+A to select all files, and press Delete.
- Optional: Reverse the settings in Step 4.
- Visit the following Web page: http://go.microsoft.com/FWLink?LinkID=34506 and click the button that allows you to upgrade Windows DRM components.
- Restart your computer.
- Optional: Restore any backed-up licenses.
by Jason Prahl | Jun 15, 2006 | Blog, Computer Tips, Microsoft Windows
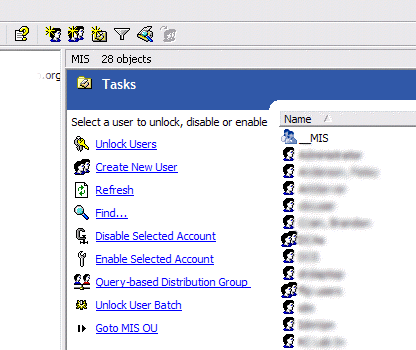 Ok, if you are a long time Windows Server administrator and already know about taskpad view in the Windows MMC you might skip reading this, or at least refrain from making fun of me for not knowing about this sooner. I just found this feature today, so it’s totally new to me and really cool. I’m not sure how many versions back this has been in, but I’m running Windows Server 2003.
It all started because I wanted to find an easy way to let specific users unlock domain accounts easily. I found this article on Microsoft’s support site about delegating the ability to unlock accounts to a group or user. Then I found some scripts for unlocking domain accounts. On one of the sites I was on they talked about adding the scripts to the taskpad view.
What on earth is the taskpad view was my first question. So I went back to the MMC and started poking around. I had long ago found the usefullness of setting up a custom MMC control panel and had added the Active Directory Users and Computers, DHCP, Exchange and other snap-ins. If you aren’t familiar with this, you first need to have the Server Admin pak installed. The Windows Server 2003 admin pak can be found here. It can be used to manage Windows 2000 or 2003 servers. If you want to do the exchange functions you need to install the exchange management console from the Exchange installation CD. Then you can goto Start/Run and type MMC. You’ll get an empty MMC console. Goto File/Add Remove Snap-in where you can add the various snap-ins. You can add a ton of useful tools here ranging from Active Directory Users and Computers to SQL Server Enterprise Manager to DNS to DHCP. You name a Microsoft Server function and you can add a snap-in for it.
You can save this custom MMC and make a shortcut to it for whenever you need these functions. Now, for the part I just discovered. Once you have a snap-in in the MMC you can then goto Action/New Taskpad View. This will add a blank area where you can add shortcuts to specific tasks like Create New User, Find etc. See the above screenshot where I’ve added several tasks. These tasks allow you to add the standard menu options or you can also add scripts and executables. This is where I added scripts to unlock users or enable and disable user accounts. The cool thing about these tasks is that you can add parameters that get fed to the scripts. For instance I can click on a user in the right pane then click unlock users and the username of the user I have selected can be fed to a VBScript that unlocks users.
I used the instructions from this article to create my unlock, enable and disable user account tasks. I had to do some tweaking of the instructions but with some playing and testing you can come up with the right scripts. Here are the three scripts I ended up with, you need to edit each of them replacing the text that says “your domain here” with your domain. There are an unlimited amount of tasks you can add to these views and you can put your most used tasks where you can get to them quickly.
by Jason Prahl | Apr 19, 2006 | Blog, Computer Tips, Microsoft Windows
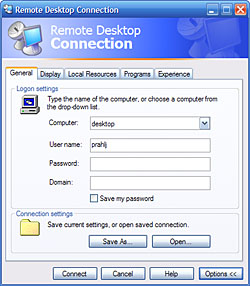
 Before there was XP Remote Desktop/Terminal services there was Netmeeting Desktop Sharing. I know some of you are saying “yeah, but what about VNC?” I’ve used it and it works well also, but mostly I use the XP Desktop Connection and Netmeeting simply because they are already there. Call me lazy. Netmeeting is nifty for those few Windows 98 machines you might still have lurking around. Plus unlike Terminal Services on Windows Server 2000 and 2003 with Netmeeting Remote Desktop you can take control of a desktop and the machine who’s desktop you have control of is able to see what you see, which can make troubleshooting a user’s computer a bit easier. I know there’s remote assistance but that doesn’t exitst for Windows 98 and I don’t think it does for Windows 2000 either.
Anyways, I configured a Windows 98 computer to allow me to connect to it’s desktop anytime using netmeeting. When you set it up it makes you put in a password. I’ve used so many passwords, I couldn’t remember what I had set it to. If you try and change the password it wants the old password in order to do so. Never fear, just delete one key in the registry and you’ll be back up and running.
Find the following key in the registry:
HKEY_LOCAL_MACHINE\Software\Microsoft\Conferencing\Mcpt
Now, delete it. You can go back in and setup Netmeeting’s desktop sharing and configure a new password without putting in the old password, hopefully one you’ll remember next time.
by Jason Prahl | Apr 17, 2006 | Blog, Computer Tips, Microsoft Windows
 We ran into a problem with a PC that had the Microsoft Firewall Client 2000 from ISA (Internet Security and Accelerator) on it. We recently upgraded our ISA server to the 2004 version. You can run the older client on the newer version but it doesn’t encrypt the traffic and it allows traffic that is normally blocked on a user level to work. So, we disabled the ability for the old client to work and began removing it from all of our computers and then installing the new version.
On one PC the old version wouldn’t un-install correctly and the new version won’t install if it’s not removed. You will get an error message that says something like “Microsoft Firewall Client 2004 cannot be installed over a previous version. Please remove the older version and try again.” Well, since the uninstall failed and it removed the old version from the Add/Remove programs we were stuck. After some poking around in the internet I found instructions on Microsoft’s site for removing the client from a Windows 98 computer. The computer I was working on is actually Windows XP, but the instructions worked on it as well. Here are the registry keys that need to be removed, so that the new version won’t think the old version is still installed:
Remove 8A95A7C8EBA9A954A939802C184A2A46
from HKEY_CLASSES_ROOT\Installer\Features\
Remove 8A95A7C8EBA9A954A939802C184A2A46
from HKEY_CLASSES_ROOT\Installer\Products\
Remove Firewall Client
from HKEY_Current_USER\Software\Microsoft\
Remove Firewall Client
from HKEY_LOCAL_MACHINE\Software\Microsoft\
Remove Firewall Client
from HKEY_USERS\Software\Microsoft\
Remove 8A95A7C8EBA9A954A939802C184A2A46
from HKEY_LOCAL_MACHINE\Software\CLASSES\Installer\Features\
Remove 8A95A7C8EBA9A954A939802C184A2A46
from HKEY_LOCAL_MACHINE\Software\CLASSES\Installer\Products\
Remove 945E895D0A5100149B4B8D6E01A3DA26
from HKEY_LOCAL_MACHINE\Software\Microsoft\Windows\CurrentVersion\Installer\Components\
Remove 8A95A7C8EBA9A954A939802C184A2A46
from HKEY_LOCAL_MACHINE\Software\Microsoft\Windows\CurrentVersion\Installer\Features\
Remove the C”\Program Files\Microsoft Firewall Client
from HKEY_LOCAL_MACHINE\Software\Microsoft\Windows\CurrentVersion\Installer\Folders\
Remove the {8C7A59A8-9ABE-459A-9A93-08C281A4A264}
from HKEY_LOCAL_MACHINE\Software\Microsoft\Windows\CurrentVersion\Uninstall
The instructions also said to find the Wspcpl32.cpl file in %Windir%\System. Delete this file to remove the Firewall Client icon in Control Panel. I didn’t need to do this step, I guess the uninstall did this before failing. I did find the install directory C:\Program Files\Microsoft Firewall Client and deleted it. After these steps the Firewall Client 2004 installed without a problem.
by Jason Prahl | Mar 27, 2006 | Blog, Computer Tips, Microsoft Windows
 Have you ever deleted an icon to a program, especially some Windows utiltity and couldn’t figure out how to get it back? That’s what I did to the Remote Desktop Connection icon, actually I’ve done it several times. I have a certain way I like my start menu and it’s totally different than it comes by default on a fresh install of XP. I’m a bit wierd like that.
To simply run the desktop connection from run on the start menu type “mstsc” and hit enter. To re-create the icon, right click where you want the icon and select new/shortcut. In the “type the location of the item” box type “mstsc”. Hit enter and type the name you want the icon to have and you’re done. You can now easily go about your desktop connected merry way.
Here’s another quick one for if you delete the Netmeeting icon. I don’t use netmeeting as much as I used to, but you can goto run and type “conf”. Use the above steps and replace the “mstsc” with “conf” and you’ll have your Netmeeting icon back and ready for action.
by Jason Prahl | Mar 11, 2006 | Blog, Computer Tips, Microsoft Windows
I’ve been using Photoshop for several years. I’m certainly no pro at it, but I can get around and do what I want. I am amazed at the power and number of things you can accomplish with it.
Every now and then I learn a little trick or tip about Photoshop and I wonder how I never found that before.

The most recent Photoshop revelation is the fact that you can hit the tab key and make the toolbars all dissappear. Some of you might be saying…”duh, you noob!” But unless you take some sort of class there are thousands of things like this that you just don’t know are there.  When I found this one I thought “cool!” It helps to be able to get all the toolbars out of the way and view all of your image. Stepping back and getting rid of the extra stuff that can be distracting is usefull.
Here are some more Photoshop tips and tricks. Remember I don’t claim to be a pro, these are just things I’ve found useful. Another thing to keep in mind is…I’m a Windows guy. Not sure if these work for you Mac users. I’m sure they are there, but it might be different keystrokes.
- Quickly resize your brush – the “[” key sizes your brush down and the “]” sizes your brush up.
- Quickly change the softness of the edge of your brush – hit shift – “[” to increase edge softness and shift – “]” to decrease edge softness.
- Quickly copy a layer – ctrl – “j”
- Always use layers to adjust levels, curves and such. This way it’s easy to undo your changes. The undo history only goes so far and it goes in order. Using layers makes it much easier. Plus you can use the layer mask to paint out portions of these adjustment layers.
What are some tips and tricks you’ve learned? Unless you are a graphic artist and went to school we all have tons of things we could learn about Photoshop. Getting the picture into your camera takes one set of skills, making it look even better afterwards takes Photoshop skills. I don’t know about you but I certainly would like to learn alot more about this essential step in photoblogging.
by Jason Prahl | Mar 1, 2006 | Blog, Computer Tips, Microsoft Windows
Earlier this week we checked out the Cisco “Now” Van. The Cisco Network on Wheels (NOW) is a 25-foot mobile showcase equipped with the latest Cisco networking technologies designed specifically for small and medium-sized businesses (SMBs). The showcase provides hands-on demonstrations of proven integrated networking solutions, which are customizable to your business size and needs. I tried to find some info on Cisco’s site about the Network on Wheels, but couldn’t easily find any. I really like Cisco products, but their website leaves alot to be desired. Do a search on Google and you’ll find lots of info on the seminars.

My first thought was that it was going to be another come check out our stuff and we’ll pressure you to buy it. While there was some sales pitches going on for some of Cisco’s products, it was very informative and usefull. The guy who did the talking was very knowledgeable and we talked extensively about wireless communications and such. Of course he pushed the reasons why Cisco’s wireless access points were so much better than everyone else’s.

One of the topics we touched on was WPA2 and how you should be using it for wireless security. I hadn’t messed with it much, so when I got back to the office I decided to turn it on in a Linksys WRT54GC access point we had. Then I used a Sony Vaio with a built in Intel 2200gb wireless adapter and Windows XP Pro with SP2. Using the Windows Wireless configuration tool I couldn’t get it to connect to the access point. If I changed the security to WPA it would connect just fine, but not with WPA2. So I went and found the latest drivers on Intel’s site. Still didn’t work. Then for some reason I decided to use the Intel Wireless utility and found I was able to connect. Hmmm… If I switched back to the Windows configuration utility, still no connection. I generally turn off any extra utilties and such that I don’t need so I don’t normally use the Intel utility to configure the wireless.
So, I went and did Windows updates and got everything there was and tried the WPA2 connection again, still not working.
Out comes trusty Google and did a search for WPA2 and Windows and found this link to Microsoft’s site. Why this isn’t included in normal Windows updates I’m not sure. It’s dated April of 05 so it’s not brand new. After installing this update the Windows Wireless config utility connects and recognizes the WPA2 protected access point just fine.
I found the following very informative article that talks about WPA2 and the differences between it and WPA.
Page 8 of 9« First«...56789»