by Jason Prahl | Feb 18, 2012 | Blog, Microsoft Windows

I wanted to reboot all PC’s in a particular OU of our Active Directory structure. I found csvde which is a tool for exporting and importing data to and from Active Directory.
Once I got all of the computer names out and into a csv file I used the shutdown -i tool to past the computer names into and let it remotely reboot them.
Here are some sample csvde scripts for exporting various pieces of information:
Export everything (computers, users, groups etc. This could be a lot of records depending on your Active Directory so be careful.):
CSVDE -f exportFilename.csv
Export computer accounts from specified OU with only a few columns (just does dn, cn and name columns):
csvde -f ComputerNamesExport.csv -d “OU=OUName,DC=domain,DC=org” -r “(objectClass=computer)” -l “dn,cn,name”
– You can leave off the -l “dn,cn,name” and you’ll get all columns.
Export user accounts from whole domain with only the specified columns:
csvde -f \\server1\common\it\UserNamesExport.csv -d “DC=CBCO,DC=org” -r “(objectCategory=person)” -l “dn,cn,displayName,description,title,department,physicalDeliveryOfficeName,company”
– You can leave off -l and the rest to get all columns.
by Jason Prahl | Feb 15, 2012 | Blog, Microsoft Windows

I’ve been in IT for several years now and for some reason I never knew this tool existed in Windows.
In the past I’ve used things like Sysinternal’s PSShutdown to remotely reboot or shut down a PC.
I found today that if you enter “Shutdown -i” at a command prompt you get a shutdown tool you can use to reboot or shutdown other PCs on the network.
I tried this on Windows Server 2003, Server 2008 and Windows 7 and it worked on all of them.
If you hold down shift when you right click on the command prompt icon and select “Run as a different user” you can launch it as a domain administrator.
by Jason Prahl | Feb 7, 2012 | Blog, Microsoft Windows
After installing Internet Explorer 9 a welcome page pops up in a seperate tab the first time you run it. I ran into a machine where it kept popping up over and over.
To fix it:
- Click start and in the search box type gpedit.msc
- In the Local Group Policy Editor navigate to:
User Configuration/Administrative Templates/Windows Components/Internet Explorer.
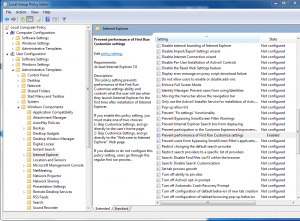
- Locate the “Prevent performance of First Run Customize settings” setting and double-click
- Click the “Enabled” setting and below that click the drop-down where it says “Select your choice.” Select “Go directly to home page.”
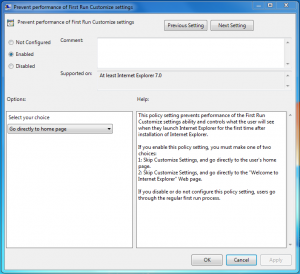
- Hit ok then close the group policy editor.
- Close and open Internet Explorer and you should be good.
by Jason Prahl | Jan 28, 2012 | Blog, Microsoft Windows

I have 2 seperate Windows 7 computers (one a laptop and one a desktop). That were showing incorrect network status icons.
The laptop had a wireless connection and was able to surf the internet and network with no problems yet it showed the bars with an asterix, which means not connected but it sees wireless networks to connect to.

The desktop had a wired connection that was functioning properly and was able to surf the internet and network yet it showed the wired icon with a red x, which mean no network cable plugged in.

Several Google searches and a few attempts that others had listed later I was still looking at the same wrong icons. I noticed on both machines a network adapter that said “Incoming Connections.” I don’t remember seeing that before and don’t know what it’s there for so I did the natural thing and deleted them. On both machines the network icons were now showing the correct status. I tried to find an explanation as to what that was but only found mention of VPN connections even though neither machine had any VPN connections setup on them. Weird fix to a wierd problem.
by Jason Prahl | Jan 24, 2012 | Blog, Microsoft Windows

I wanted to test out Microsoft Sharepoint Server and decided to test it on a Hyper-V virtual server. I guess I’ve finally learned not to experiment directly on production servers finally. That tends to possibly cause problems.
So, on one of my servers which I had recently updated to Windows Server 2008 R2 I decided to add the Hyper-V role and setup a test server. After adding the role I kept getting error messages and Hyper-V wouldn’t start.
The error stated:
‘Hypervisor’ driver required by the Virtual Machine Management service is not installed or is disabled. Check your settings or try reinstalling the Hyper-V role.
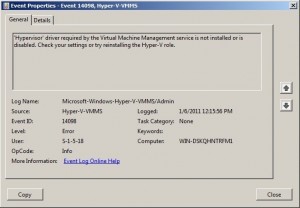
After some Googling I found several people saying I needed to make sure No-Excecute Memory Protection and Intel Virtualization Technology were enabled in the bios. I was familiar with the second setting and had enabled it on machines before but not the first. My server is an HP DL380 G5 and here are the steps for fixing the issue:
1. Reboot the server and hit F9 to enter the Bios.
2. Go to Advanced options > Processor Options
3. Find the “No-Excecute Memory Protection” and enable it. (Hit enter)
4. Find the “Intel(R) Virtualization Technology” and enable it. (Hit enter)
5. Save and exit using F10
After reboot my Hyper-V is all happy and functioning.
by Jason Prahl | Jan 23, 2012 | Blog, Microsoft Windows

I use Ping (not the sort of ping in the picture above) to make sure I can communicate with my servers all the time. Windows Server 2008 doesn’t allow Ping responses through the Windows Firewall.
Here’s how to enable Ping responses:
Open the Windows Firewall Advanced settings (Open Network and Sharing Center, click Windows Firewall bottom left, then Advanced settings).
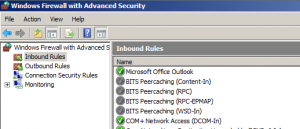
Find the File and Printer sharing (Echo Request – ICMPv4-In) in the Inbound Rules section and ICMPv6 if you want to enable IPv6 responses.
Double click each rule and select enabled or right-click and select Enable Rule.

You should now be able to ping the server.
by Jason Prahl | Jan 17, 2012 | Blog, Microsoft Windows

Here are two methods for auto login on Windows 7. The first if for computers that are not members of a domain and the second is for those that are members of a domain.
Non-domain computer:
1.Press the Windows key + R on your keyboard to launch the “Run” dialog box.
2.Type in control userpasswords2
3.Press Enter. The User Accounts window will display.
4.Uncheck the option “Users must enter a user name and password to use this computer”
5.Click “OK”
6.You will then be prompted to enter the current password and confirm it.
7.After doing so, you will no longer be prompted to enter your password upon login.
Domain computer:
1. Press the Windows key + R on your keyboard to launch the “Run” dialog box.
2. Type regedit and hit enter to open the Registry Editor
3. Then browse to HKEY_LOCAL_MACHINE\SOFTWARE\Microsoft\WindowsNT\CurrentVersion\Winlogon\
4. Set AutoAdminLogon = 1 (Create it if it doesn’t exist. Make it a string variable)
5. Set DefaultUserName = your username (Create it if it doesn’t exist. Make it a string variable)
6. Set DefaultPassword = your password (Create it if it doesn’t exist. Make it a string variable)
7. Set DefaultDomainName = your domain (Create it if it doesn’t exist. Make it a string variable)
by Jason Prahl | Jan 15, 2012 | Android, Blog, Microsoft Windows

I’ve been trying unsuccessfully for a couple of days to get my Android tablet to browse network shares from my Windows 7 PCs. No matter what I did or how many different clients I tried none of them would connect. After messing with settings on both the tablet and my PCs even my iPad would not connect to any shares even though it was previously working. The rest of my PCs would open the shares just fine. Through troubleshooting the iPad I came across an article on Stratospherix‘s website based on a Microsoft knowledge base post that mentioned a registry setting sometimes needed changed to allow additional network clients to connect to Windows shares. I’m not even entirely sure this is what fixed my issues but after changing this on one of my machines I was able to connect from both the iPad and my Android tablet.
Here’s the registry key to add:
- Click Start, click Run, type regedit and then click OK.
- Locate and then click the following registry subkey:
HKEY_LOCAL_MACHINE\SYSTEM\CurrentControlSet\Services\LanmanServer\Parameters
- Click Edit, point to New, and then click DWORD Value.
- Type IRPStackSize, and then press ENTER to name the value.
(The name is case-sensitive)
- Click Edit, and then click Modify.
- Click Decimal and in the Data Value box, type 30, and then click OK.
- Restart your PC and then re-try to connect with the app.
Update: 1/16/2012 – I tested this on another PC and can confirm that this fixed my connection issues. I was not able to connect to another PC on my network on either my iPad or Android tablet. I added the registry key, rebooted and was immediately able to connect both devices. I still had issues using ES File Explorer and credentials that included special characters. If I changed the password to one without special characters I was able to connect but with special characters it would give a login failure. Other Samba clients like AndSMB or Astro worked with the special characters in the password.
by Jason Prahl | Oct 31, 2010 | Blog, Computer Tips, Microsoft Windows, Software

I like Windows Media Center, but lately I’ve been liking XBMC more for streaming media to my TV. I bought a Roku player and love it, but (for now) there are things it doesn’t yet do that I want. Namely Hulu Plus (coming soon) and reliable, easy network streaming of my own content. PlayOn is not bad but just there yet for me plus it costs $49.99 plus $19.99 a year.
XBMC has an excellent interface and works well with streaming music and video from Windows shares.
I have a Windows Media Center remote that also works well with XBMC but the green button on it launches Media Center. A web search came up with Jacob Johnston’s blog who wrote a cool little tool for fixing this dilemma.
Get it here.
Jacob also has a launcher for Boxee if you prefer it to XBMC, available at the link above.
by Jason Prahl | Aug 11, 2010 | Blog, Computer Tips, Microsoft Windows

I use XCopy to back stuff up because it’s fast and easy. Until you add 11,898 files you don’t want to actually backup.
So I set about trying to figure out how to exclude directories and or files from the XCopy routine.
It turned out to be pretty easy.
I basically have 2 text files. RunBackup.cmd and MyExcludes.txt
They both reside in the same folder.
The RunBackup.cmd text file has just the following line in it (all one line no line breaks):
xcopy /E /Y “C:\MySourceDirectory\subdirectory” “G:\MyDestinationDirectory\subdirectory\” /EXCLUDE:MyExcludes.txt
The MyExcludes.txt has the following line in it:
\Storage\
So this backs up everything in the source directory including subdirectories to the destination directory but excludes anything in a directory called \Storage and all sub-directories and files below that.
You can also put (each on a seperate line) things like:
\Storage\
.doc
.pdf
That would do the same as above but also exclude any .doc and .pdf files from any directories in the source.
Tested on Windows 7 Professional.


