by Jason Prahl | Mar 5, 2006 | Blog, Miscellaneous
I thought I’d spruce up my blog and wanted to make the header image at the top change randomly. I started trying to do it myself and thought I’d hit Google to see if anyone else had done it. You gotta love Google, sure enough Patrick David had done this very thing and had written a nice plugin for WordPress to do just what I wanted. Using it was a piece of cake. You simply create a folder in your wp-content folder called rand_headerimg and put your header images in there. Then you download the plugin and upload it to the plugin folder. Login to the admin section and activate the plugin. That’s it, easy as drinking milk and eating a donut and costs less too! Not sure what the milk and donut picture has to do with this, but I just liked it for some strange reason.
by Jason Prahl | Mar 5, 2006 | Blog, Websites
I’m really trying to make an effort at writing more on my blog. I don’t get all that much traffic on this blog, but it’s fun to write anyways. Sometimes it’s just sort of theraputic to write even if no one is reading it!I ran across a very neat photography site called Digital Outback Photo. The site offers great info and focuses on “.. web magazine for quality outdoor photography using digital cameras.” I read a couple of articles so far and was pretty impressed with their indepth writing. Outdoor photography seems to be the area I am most comfortable and interested in, but even if you aren’t into outdoor nature type photography, they cover many topics that are applicable to all types of photography and post-processing.
Another great photography site I found was Ken Rockwell’s website. Someone in the forums over at DPReview.com mentioned his site, so I thought I’d check it out. He has a number of articles with great information. He has an article called “How to make great photographs“, which I found pretty interesting.
I love Photoblogs.org. Now I love it even more. They are releasing a new version of the site that has been reworked and is sharper than ever. You can check it out here. This new version is supposed to be released later this month. I really like what they’ve done with the site both asthetically and as far as how it works.
I use WordPress for my blog and a couple of other blogs that I work with like MISGuys.com, squatRSS and General-Admission.com. We’ve recently upgraded them all to using version 2.0.1 of WordPress. If you are using WordPress and aren’t using this version I highly recommend it. There are alot of new features and the admin interface is great. There is a image upload feature that’s worth the upgrade on it’s own! The upgrade from version 1.5 went very well also!
by Jason Prahl | Mar 5, 2006 | Photo - Misc, Photoblog

by Jason Prahl | Mar 4, 2006 | Photo - Kids, Photo - Misc, Photoblog

Check out yesturday’s post to see what they are entranced by.
by Jason Prahl | Mar 3, 2006 | Blog, Photography
I think the area of photography I like best is nature. I really enjoy wandering around the woods and just seeing what I can find. I love shots with neat skies, especially when you can catch fantastic shapes and patterns in the clouds. One area that I have wanted to experiment with is macro photography. Keep in mind as you read this and view the samples that I didn’t spend much time making the samples. I did them all without a tripod and with less than ideal light.
Early on I bought a set of close up filters. As you can see with this shot, they didn’t work to well. At first I thought it was just my in-experience with photography in general and I set them aside. I pulled them out a couple of times, but each time just got frustrated. I’m guessing the haziness is because I bought a cheap set of the filters. Maybe a higher quality set would work and look better.
My Sigma 70-300mm f/4-5.6 DL Macro Super II lens has a macro mode and it works pretty well. I was able to get this shot of a bug with it. But I could never get really up close with it like I wanted to. The advantage to using this is you have a greater working distance. So, if your subject is skitish this will help.

I did some reading on the web and found some suggestions to try reverse rings. These come in two flavors. The first type mount directly on the body of your camera and then allow you to screw your lens onto the ring with the lens turned around backwards. The second type, which I haven’t tried, mounts to the front of one of your lenses and then you can mount a second lense turned around backwards onto that by the filter rings on the front of the lens. The first type of reverse ring is what I tried and with your lens on the camera backwards you are able to get up close and focus. One downside to this is you lose all of your automatic features. Your metering doesn’t work, autofocus doesn’t work and you have to control your aperature on the lens itself. This isn’t the end of the world because at such close distances you generally have to focus the camera yourself anyways. It was a little wierd having to use the ring on the lens to control aperature, but that’s how they used to do it! One advantage to this method is price. The reverse ring cost about $12.50 off of ebay including shipping! As you can see by the shot it’s actually not to bad. Much better than the close up filters. You are limited by the filter ring size of your lens, so in my case I can only use one lens with it.

So after some reading on DPReview.com in the forums, I decided to try out the Kenko extension tubes. I had seen several shots by Cédric over at VisualExperience.com, like this one. I noticed he had used the Kenko extension tubes and thought I’d give them a try. I got them from B and H Photo. Out of the attempts at macro shots I like the Kenko extension tubes the best. This is an example of a shot with the tubes. With this method I was able to get the closest and get the most detail out of the methods I tried. One downside to this though is your working distance. If you are shooting static objects with a tripod it’s no big deal. I haven’t tried shooting live bugs or anything like it yet. I’ll let you know when it warms up outside!
There is another method of getting macro shots and that’s to get an actual macro lens. The Nikon 60mm macro lens is one I’ve read alot of people use. This is the most expensive method to getting into this type of shooting and not an avenue I have explored yet. The Nikon 60mm macro is $389 new from B and H photo. I imagine you can get it for a little less on ebay.I can’t wait for spring so I can get out the extension tubes and find some bugs to shoot. I doubt I’ll rival Cédric from Visual-Experience.com but I’ll try my hardest! If anyone has any experience with any of the methods or has any other method that I missed, I’d love to hear your opinion.
by Jason Prahl | Mar 3, 2006 | Photo - Food, Photo - Misc, Photoblog

My kids love donuts…ok, I like them too. So, we went to Krispy Kreme and watched the donuts being made and ate a couple as well. Lots of fun.
by Jason Prahl | Mar 3, 2006 | Photo - Misc, Photo - Water, Photoblog

by Jason Prahl | Mar 2, 2006 | Photo - Misc, Photoblog
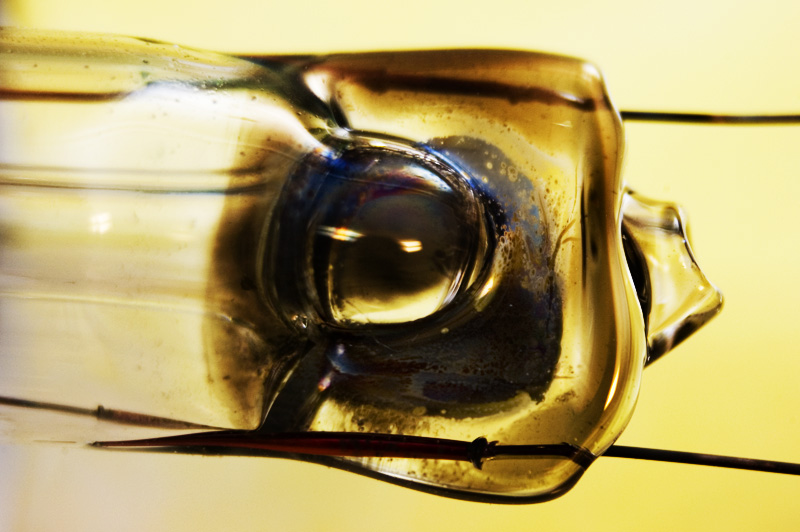
What am I?
Update: Check out my blog post on macro photography for more info on how I shot this and the recent macro shots.
by Jason Prahl | Mar 1, 2006 | Blog, Computer Tips, Microsoft Windows
Earlier this week we checked out the Cisco “Now” Van. The Cisco Network on Wheels (NOW) is a 25-foot mobile showcase equipped with the latest Cisco networking technologies designed specifically for small and medium-sized businesses (SMBs). The showcase provides hands-on demonstrations of proven integrated networking solutions, which are customizable to your business size and needs. I tried to find some info on Cisco’s site about the Network on Wheels, but couldn’t easily find any. I really like Cisco products, but their website leaves alot to be desired. Do a search on Google and you’ll find lots of info on the seminars.

My first thought was that it was going to be another come check out our stuff and we’ll pressure you to buy it. While there was some sales pitches going on for some of Cisco’s products, it was very informative and usefull. The guy who did the talking was very knowledgeable and we talked extensively about wireless communications and such. Of course he pushed the reasons why Cisco’s wireless access points were so much better than everyone else’s.

One of the topics we touched on was WPA2 and how you should be using it for wireless security. I hadn’t messed with it much, so when I got back to the office I decided to turn it on in a Linksys WRT54GC access point we had. Then I used a Sony Vaio with a built in Intel 2200gb wireless adapter and Windows XP Pro with SP2. Using the Windows Wireless configuration tool I couldn’t get it to connect to the access point. If I changed the security to WPA it would connect just fine, but not with WPA2. So I went and found the latest drivers on Intel’s site. Still didn’t work. Then for some reason I decided to use the Intel Wireless utility and found I was able to connect. Hmmm… If I switched back to the Windows configuration utility, still no connection. I generally turn off any extra utilties and such that I don’t need so I don’t normally use the Intel utility to configure the wireless.
So, I went and did Windows updates and got everything there was and tried the WPA2 connection again, still not working.
Out comes trusty Google and did a search for WPA2 and Windows and found this link to Microsoft’s site. Why this isn’t included in normal Windows updates I’m not sure. It’s dated April of 05 so it’s not brand new. After installing this update the Windows Wireless config utility connects and recognizes the WPA2 protected access point just fine.
I found the following very informative article that talks about WPA2 and the differences between it and WPA.


