by Jason Prahl | Jun 27, 2006 | Blog, Computer Tips, Microsoft Windows
 I have a user I want to be able to disable or enable other domain user accounts without giving that user to much permissions. I spent some time Googling and on Microsoft’s support site and couldn’t find a specific permission that allowed just that. I found one that allows you to delegate the ability to unlock a user account. After playing with this for a couple of hours I grew to appreciate the complexity and power Active Directory gives an administrator over a domain. What I finally ended up using was a permission that allows for the user to enable/disable as well as change anything in the account options window on the Account tab. A bit more than I wanted to give, but not a problem in my case.
Right-click your domain and select delegate control. The delegate control wizard starts, click next to begin. Next select the users or groups that you want to delegate the responsibility to. In my case I have a group called “DisableEnableUsers” that I want to give the ability to disable/enable user accounts.
Next select create custom task to delegate radio button and hit next. On the “Delegate control of:” dialog select “Only the following objects” and scroll down to “User Objects” hit next. Put a check in the “General” box on the “Show these permissions:” window. Scroll down to the “Read and Write Account Restrictions.” Hit next and finish.
Now the users and or groups you delegated control to “Read and Write Account Restrictions” will be able to disable or enable user accounts.
by Jason Prahl | Jun 27, 2006 | Blog, Computer Tips
 SQLServerOne of our database’s transaction log had grown to over 5gig. Considering the actual size of the database itself and the amount of activity this is huge. Plus it slows down our back-ups and just generally bugs me.
So, first I’ll tell you how not to try and clean it up. Don’t goto the Enterprise manager and right click on the database and select “Take Offline.” The next thing you don’t want to do is go and delete the transaction log file now that the database is offline. This sounds like a good idea and yet it’s not. When you goto bring the database back online it will kick and scream and throw fits and generally not work. Plus if the transaction log is large like say 5gig, it’s too big to send to the recycle bin and it gets permanently deleted.
The way you should shrink the size of the transaction logs is this:
a) Detach the database using sp_detach_db procedure (before that ensure no processes are using the database files.) Open query analyzer and type: “sp_detach_db ‘DB Name'” then execute query.
b) Delete the log file. (I feel more safe simply renaming it before deleting it.)
c) Attach the database again using sp_attach_db procedure.
This will tell the database server that the database was closed cleanly and it will proceed to create a new transaction log.
Update 10/03/06: We’ve since switched to using the following command to shrink our transaction log:
backup log “databasename” with Truncate_only
DBCC SHRINKFILE (‘databasename_log’,truncateonly)
It’s been pointed out to us that detaching the database is not a safe way to shrink your transaction log. We stand corrected! :)
by Jason Prahl | Jun 26, 2006 | Blog, Computer Tips
 I’m not a huge Frontpage fan for the most part, but when it comes to creating ASP pages with database results it does do a good job. There are some things that it lacks, but overall you can get a nicely formatted report that is easily distributable through an intranet.
One of the things I had thought when working on past ASP pages is the lack of a record count. After some poking around the newsgroups (gotta love Usenet!) I found some pieces of code that I finally tweaked and experimented with enough to add a record count to an ASP page containing Frontpage Database Results.
The main piece that generates the count is this:
Now, the placement of this little bit of code is key. You need to switch to code or split view so you can past this into the actual HTML. It needs to be within the database results region. If you place it in certain places on the page, Frontpage, being the clever helper, will simply remove it. If you place it to high in the results region you will get a count but it will be off by one. The reason for this is because it’ll start with 0 as the first record. So, it really needs to be at the end of the results region.
After playing around a bit I found it works best just below the table holding the database results. I added the following:

by Jason Prahl | Jun 24, 2006 | Blog, Computer Tips, Microsoft Windows
 I’ve used Nero almost exclusively for burning for several years now. I recently purchased the latest version and installed the whole thing. It now comes with a bunch of applications 90% of which I care nothing about. One new annoyance, in my opinion, is something called Nero Scout.
Truthfully I don’t even know what it is. It looked like something for finding and cataloging media files. I have my ways and methods and don’t need a new tool for this. It puts an annoying icon in my Windows Explorer that I don’t want there. I’m very particular about my computers and I don’t want anything extra floating around anywhere. So I figured it must have been installed with all the extra junk and it must go away if I remove all of the Nero applications except the actual burning part. Wrong. It was still there after un-installing all the rest. So after some poking around the web I found the following commands to remove the little pest. Goto Start/Run and execute one of these. It simply un-registers the dll associated with Nero Scout.
Remove Nero Scout:
regsvr32 /u “%commonprogramfiles%\Ahead\Lib\MediaLibraryNSE.dll”
Put it back:
regsvr32 “%commonprogramfiles%\Ahead\Lib\MediaLibraryNSE.dll”
Thanks to DjLizard.net for the info
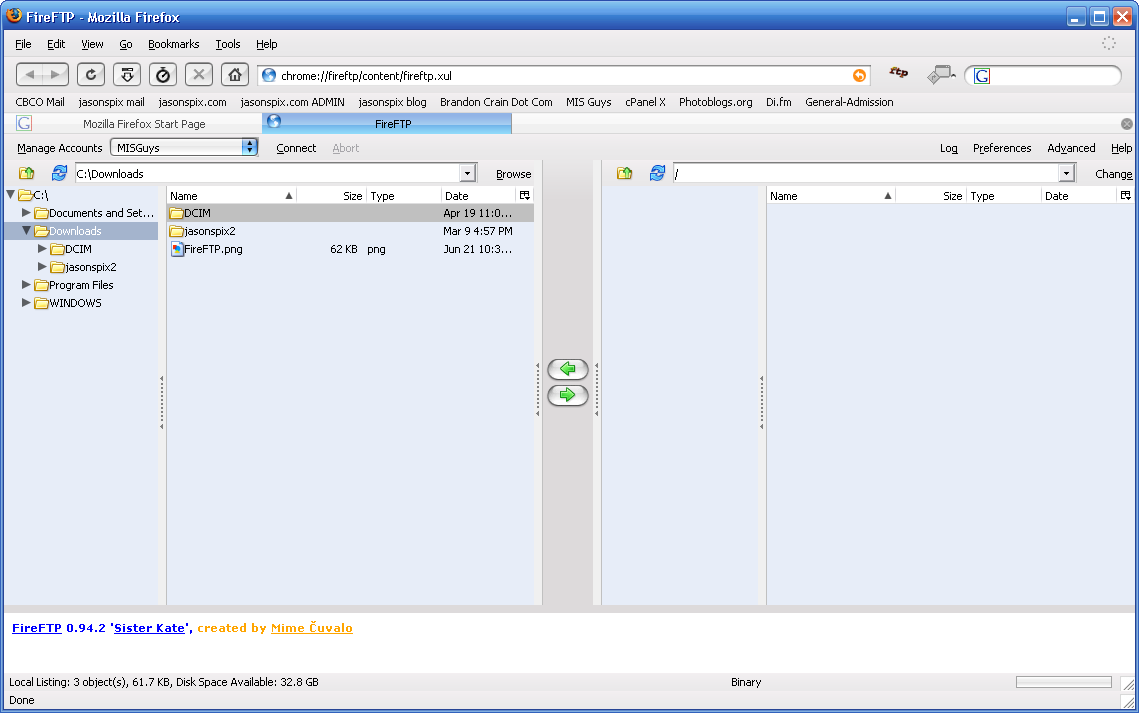
by Jason Prahl | Jun 21, 2006 | Blog, Software
A full featured FTP program accessible right inside Firefox!
This is a great new extension. FireFTP is a sharp looking and well functioning FTP client.
While you are at it, grab the FireFTP button extension which makes it a snap to add a convenient button on your toolbar to open FireFTP.
Click the screenshot for a larger version.
by Jason Prahl | Jun 19, 2006 | Blog, Websites
My word…that’s about all I can say about the shots that are on this site.
Here’s a disclaimer found on the Timecatcher.com site:
WARNING: Numerous scientific research has proven this site to be a real feast for the eyes. You may experience the will to quit your day job and travel. We cannot be held responsible for such actions. Viewer discretion is advised.
Scientific or not, I can attest to it…I am ready to quit my day job.
by Jason Prahl | Jun 16, 2006 | Blog, Computer Tips, Microsoft Windows
 DRM keeps poking up it’s ugly head, and it’s really beginning to irk me. I mainly use Windows Media Center to record HBO movies. I had about 9 or so recorded, and today I’m sick, so I thought it would be a perfect time to watch some of them, but what do you know, none of them work. I tried my main PC running Media Center, and the Media Center Extender in the front room. Both give an an error saying it’s protected content and won’t let me watch any of them!
I read about people running into issues after installing Update Rollup 2 for Media Center 2005, because Rollup 2 installs an updated Digital Rights Management (DRM) package. I’ve had the Rollup 2 installed for months with no problems, and now all of a sudden I’m getting this protected content crap!
I found this statement on Microsoft’s website. The Microsoft Windows Media Digital Rights Management (DRM) system may not work if you make changes to your computer hardware.
So basically if certain components are changed in your PC, like I changed out a hard drive, Windows Media DRM may not work because it views the change as an unauthorized attempt to move protected content to another computer. Crap like this makes me want to pirate everything, and not purchase anything legally anymore. I’m paying for HBO, and I can’t even record it! Ahhh.
So for the others who may run into this problem, here’s the fix, courtesy of Aaron Stebner. Be sure to back up any licenses to protected content first, and then perform the following steps:
- Close Media Center and Windows Media Player.
- Click Start, Run. In the Open box, type cmd and click OK to open a Command Prompt window. At the command prompt, enter the command net stop ehrecvr and press Enter.
- Click Start, Run. In the Open box, type %allusersprofile%\drm and Press Enter.
- In the Windows Explorer window for the DRM folder, choose Tools, Folder Options. Click the View tab and select the Show hidden files and folders option and then clear the Hide protected operating system files option. Click OK to close the Folder Options dialog box.
- Click in the Windows Explorer window for the DRM folder, press Ctrl+A to select all files, and press Delete.
- Optional: Reverse the settings in Step 4.
- Visit the following Web page: http://go.microsoft.com/FWLink?LinkID=34506 and click the button that allows you to upgrade Windows DRM components.
- Restart your computer.
- Optional: Restore any backed-up licenses.
by Jason Prahl | Jun 15, 2006 | Blog, Photography
I have always liked the shots from inside a car taken at night. I’ve tried them in the past and just hadn’t been that impressed with the results. I was reading a photography magazine and they had a feature about these types of shots. The writer of the article explained that he took his tripod and set it up in the front area of his car and used that to get his shots. So, I put up my tripod and wedged one leg between the driver and passenger seat, stuck my camera on it and grabbed my remote. Using the remote in combination with the tripod makes it much easier and safer to shoot periodically while driving. I turned off the autofocus and set my focus ring on infinity. The sample below is a 30 second exposure at F13. You can play with different exposure lengths and settings to get the ideal shot. I wish I had a wider angle lens so I could get more in the shot. This shot was done with my lens at 24mm. It seemed to me that the better shots where those where the road stayed straight during the exposure and when I would pass under one or two stop lights.
by Jason Prahl | Jun 15, 2006 | Blog, Computer Tips, Microsoft Windows
 Ok, if you are a long time Windows Server administrator and already know about taskpad view in the Windows MMC you might skip reading this, or at least refrain from making fun of me for not knowing about this sooner. I just found this feature today, so it’s totally new to me and really cool. I’m not sure how many versions back this has been in, but I’m running Windows Server 2003.
It all started because I wanted to find an easy way to let specific users unlock domain accounts easily. I found this article on Microsoft’s support site about delegating the ability to unlock accounts to a group or user. Then I found some scripts for unlocking domain accounts. On one of the sites I was on they talked about adding the scripts to the taskpad view.
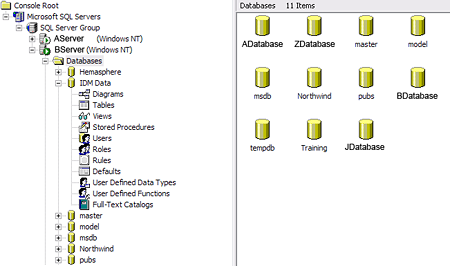
What on earth is the taskpad view was my first question. So I went back to the MMC and started poking around. I had long ago found the usefullness of setting up a custom MMC control panel and had added the Active Directory Users and Computers, DHCP, Exchange and other snap-ins. If you aren’t familiar with this, you first need to have the Server Admin pak installed. The Windows Server 2003 admin pak can be found here. It can be used to manage Windows 2000 or 2003 servers. If you want to do the exchange functions you need to install the exchange management console from the Exchange installation CD. Then you can goto Start/Run and type MMC. You’ll get an empty MMC console. Goto File/Add Remove Snap-in where you can add the various snap-ins. You can add a ton of useful tools here ranging from Active Directory Users and Computers to SQL Server Enterprise Manager to DNS to DHCP. You name a Microsoft Server function and you can add a snap-in for it.
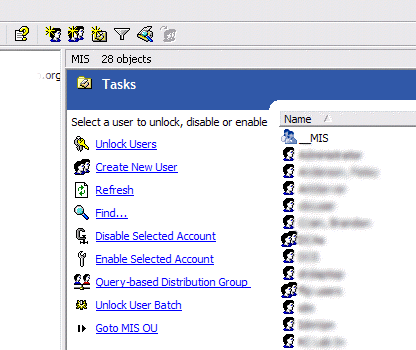
You can save this custom MMC and make a shortcut to it for whenever you need these functions. Now, for the part I just discovered. Once you have a snap-in in the MMC you can then goto Action/New Taskpad View. This will add a blank area where you can add shortcuts to specific tasks like Create New User, Find etc. See the above screenshot where I’ve added several tasks. These tasks allow you to add the standard menu options or you can also add scripts and executables. This is where I added scripts to unlock users or enable and disable user accounts. The cool thing about these tasks is that you can add parameters that get fed to the scripts. For instance I can click on a user in the right pane then click unlock users and the username of the user I have selected can be fed to a VBScript that unlocks users.
I used the instructions from this article to create my unlock, enable and disable user account tasks. I had to do some tweaking of the instructions but with some playing and testing you can come up with the right scripts. Here are the three scripts I ended up with, you need to edit each of them replacing the text that says “your domain here” with your domain. There are an unlimited amount of tasks you can add to these views and you can put your most used tasks where you can get to them quickly.
by Jason Prahl | Jun 7, 2006 | Blog, Photography
 Need an idea for some new shots? Check out camera tossing. I’m not sure you want to do this with your Nikon D70 or Canon 20D. But if you have an older camera laying around that you wouldn’t cry if it happens to hit the ground instead of your hands after being tossed, then you could have something new to try.
I know I’m going to try it with my Canon SD300. I’ll post some shots from it later, as long as I don’t break the thing first!
Update: These are some samples I did using my Canon SD300. It’s not near as cool as some of the samples from the camera tossing blog, but it’s my first attempt! You can click the small versions and see a larger version. They work pretty well as a wallpaper!
Check out these samples on Flickr as well.